主题的配置。该博客使用Next主题。首先安装主题,在跟目录下运行
1 | git clone https://github.com/theme-next/hexo-theme-next themes/next |
然后使用主题,在根目录_config.yml配置文件中,找到theme。修改为next。设置语言为 language: zh-CN;注意不是themes/next/_config.yml
1. 目前 NexT 支持的语言如以下表格所示:
| 语言 | 代码 | 设定实例 |
|---|---|---|
| English | en | language: en |
| 简体中文 | zh-Hans | language: zh-Hans |
| Français | fr-FR | language: fr-FR |
| Português | pt | language: pt |
| 繁體中文 | zh-hk 或者 zh-tw | language: zh-hk |
| Русский язык | ru | language: ru |
| Deutsch | de | language: de |
| 日本語 | ja | language: ja |
| Indonesian | id | language: id |
2. 菜单管理
1 | menu: |
3. 设定对应菜单项的图标,对应的字段是 menu_icons。 此设定格式是 item name: icon name,
1 | menu_icons: |
4. 启动页面浏览量功能。这里使用的是leancloud。在leancloud官网获取AppID and AppKey。
1 | leancloud_visitors: |
5. 文章评论系统。这里使用的是来必力。第一次使用直接按照套路注册就可以。然后使用免费的City版本,

点击现在安装,出现如下界面。

复制其中的uid字段。打开主题目录下的 blog/themes/next/_config.yml 配置文件,定位到 livere_uid 字段,粘贴上刚刚复制的UID。至此,大功告成。
6. 添加文章分享功能。这里使用AddThis。可以选择样式和哪里分享,很不错。

注册账号,慢慢弄,根据喜好,找自己喜欢的样式。注册后找到该位置。
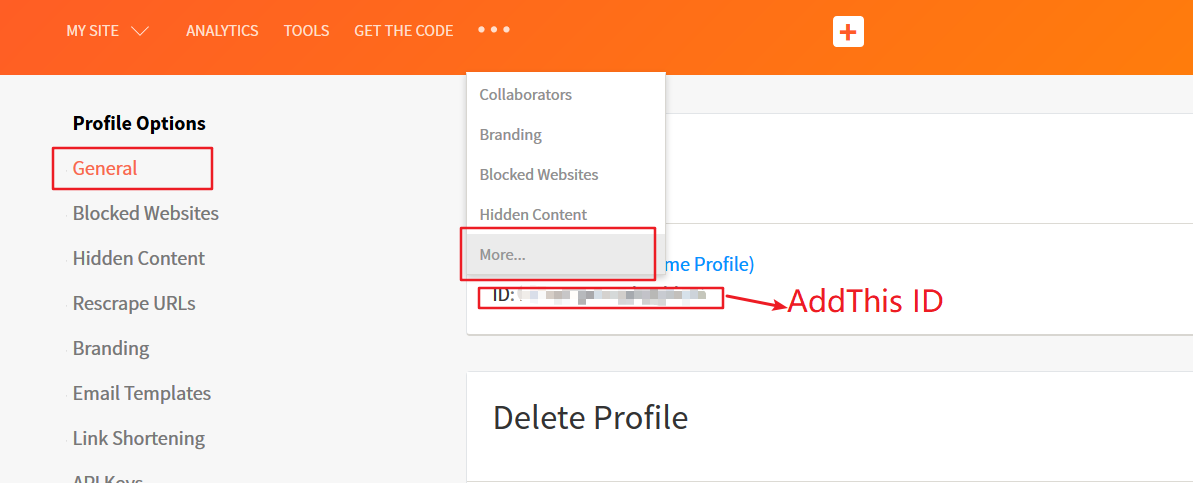
在主题配置文件中搜索add_this_id,去掉前面的注释,添加上你的AddThis ID就可以了。
1 | # Share 分享 |
7. 打开文章后侧边栏目录显示问题

number为true时自动排号。
8. 修改fonts.googleapis.com加载极慢问题。
在next主题的_config.yml里面找到 host 。然后改为
1
2# Uri of fonts host. E.g. //fonts.googleapis.com (Default).
host: //fonts.lug.ustc.edu.cn # fonts.lug.ustc.edu.cn是中科大的源。
9. 修改第三方JS库
在主题配置文件中设定成合适的 CDN 地址,此特性可以加速静态资源(JavaScript 第三方库)的加载。
例如:
1
2
3
4
5
6
7
8
9
10
11
12
13
14
15
16
17
18
19
20
21
22
23
24
25
26
27
28
29
30
31
32
33
34
35
36
37
38
39
40
41
42
43
44
45
46
47
48
49
50
51
52
53
54
55
56
57
58# Script Vendors.
# Set a CDN address for the vendor you want to customize.
# For example
# mquery: https://ajax.googleapis.com/ajax/libs/jquery/2.2.0/jquery.min.js
# Be aware that you should use the same version as internal ones to avoid potential problems.
# Please use the https protocol of CDN files when you enable https on your site.
vendors:
# Internal path prefix. Please do not edit it.
_internal: lib
# Internal version: 2.1.3
jquery: //cdn.jsdelivr.net/jquery/2.1.3/jquery.min.js
# Internal version: 2.1.5
# See: http://fancyapps.com/fancybox/
fancybox: //cdn.jsdelivr.net/fancybox/2.1.5/jquery.fancybox.pack.js
fancybox_css: //cdn.jsdelivr.net/fancybox/2.1.5/jquery.fancybox.min.css
# Internal version: 1.0.6
# See: https://github.com/ftlabs/fastclick
fastclick: //cdn.jsdelivr.net/fastclick/1.0.6/fastclick.min.js
# Internal version: 1.9.7
# See: https://github.com/tuupola/jquery_lazyload
lazyload: //cdn.jsdelivr.net/jquery.lazyload/1.9.3/jquery.lazyload.min.js
# Internal version: 1.2.1
# See: http://VelocityJS.org
velocity: //cdn.jsdelivr.net/velocity/1.2.3/velocity.min.js
# Internal version: 1.2.1
# See: http://VelocityJS.org
velocity_ui: //cdn.jsdelivr.net/velocity/1.2.3/velocity.ui.min.js
# Internal version: 0.7.9
# See: https://faisalman.github.io/ua-parser-js/
ua_parser: //cdn.jsdelivr.net/ua-parser.js/0.7.10/ua-parser.min.js
# Internal version: 4.6.2
# See: http://fontawesome.io/
fontawesome: //maxcdn.bootstrapcdn.com/font-awesome/4.7.0/css/font-awesome.min.css
# Internal version: 1
# https://www.algolia.com
algolia_instant_js:
algolia_instant_css:
# Internal version: 1.0.2
# See: https://github.com/HubSpot/pace
# Or use direct links below:
# pace: //cdn.bootcss.com/pace/1.0.2/pace.min.js
# pace_css: //cdn.bootcss.com/pace/1.0.2/themes/blue/pace-theme-flash.min.css
pace: //cdn.bootcss.com/pace/1.0.2/pace.min.js
pace_css: //cdn.bootcss.com/pace/1.0.2/themes/blue/pace-theme-flash.min.css
# Internal version: 1.0.0
# https://github.com/hustcc/canvas-nest.js
canvas_nest: //cdn.bootcss.com/canvas-nest.js/1.0.1/canvas-nest.min.js
10. 文章末尾统一添加“本文结束”标记
在路径\themes\next\layout_macro中新建passage-end-tag.swig文件,并添加以下内容:
1 | <div> |
接着打开\themes\next\layout_macro\post.swig文件,在这个位置添加代码:
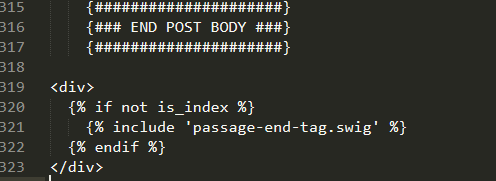
要添加的代码如下:
1 | <div> |
然后打开主题配置文件,在末尾添加:
1 | # 文章末尾添加“本文结束”标记 |